
WC_Checkout
Overview
The tasks of remembering a customer’s selections and calculating their total are complex enough that the job of collecting additional information and building an order warranted another Class to maintain separation of concerns.
Enter WC_Checkout.
You can think of this class as WooCommerce’s proofreader: making sure everything’s correct and gathering any additional information before finally converting a cart to a sales order, and forwarding it to the payment gateway.
Magic Methods
WC_Checkout makes heavy use of Magic methods to maintain backwards compatibility and simplicity for its interface.
public function __set( $key, $value ) {
  switch ( $key ) {
	case 'enable_signup':
	  $bool_value = wc_string_to_bool( $value );

	  if ( $bool_value !== $this->is_registration_enabled() ) {
	  	remove_filter( 'woocommerce_checkout_registration_enabled', '__return_true', 0 );
		remove_filter( 'woocommerce_checkout_registration_enabled', '__return_false', 0 );
		add_filter( 'woocommerce_checkout_registration_enabled', $bool_value ? '__return_true' : '__return_false', 0 );
	  }
	  break;
	case 'enable_guest_checkout':
	  $bool_value = wc_string_to_bool( $value );
	 	if ( $bool_value === $this->is_registration_required() ) {
		 remove_filter( 'woocommerce_checkout_registration_required', '__return_true', 0 );
		 remove_filter( 'woocommerce_checkout_registration_required', '__return_false', 0 );
		 add_filter( 'woocommerce_checkout_registration_required', $bool_value ? '__return_false' : '__return_true', 0 );
		}
	  break;
	case 'checkout_fields':
	  $this->fields = $value;
	  break;
	case 'shipping_methods':
	  WC()->session->set( 'chosen_shipping_methods', $value );
	  break;
	case 'posted':
	  $this->legacy_posted_data = $value;
	  break;
	}
}
public function __get( $key ) {
if ( in_array( $key, array( 'posted', 'shipping_method', 'payment_method' ), true ) && empty( $this->legacy_posted_data ) ) {
$this->legacy_posted_data = $this->get_posted_data();
}
switch ( $key ) {
case 'enable_signup':
return $this->is_registration_enabled();
case 'enable_guest_checkout':
return ! $this->is_registration_required();
case 'must_create_account':
return $this->is_registration_required() && ! is_user_logged_in();
case 'checkout_fields':
return $this->get_checkout_fields();
case 'posted':
wc_doing_it_wrong( 'WC_Checkout->posted', 'Use $_POST directly.', '3.0.0' );
return $this->legacy_posted_data;
case 'shipping_method':
return $this->legacy_posted_data['shipping_method'];
case 'payment_method':
return $this->legacy_posted_data['payment_method'];
case 'customer_id':
return apply_filters( 'woocommerce_checkout_customer_id', get_current_user_id() );
case 'shipping_methods':
return (array) WC()->session->get( 'chosen_shipping_methods' );
}
}WC_Checkout Data Flow
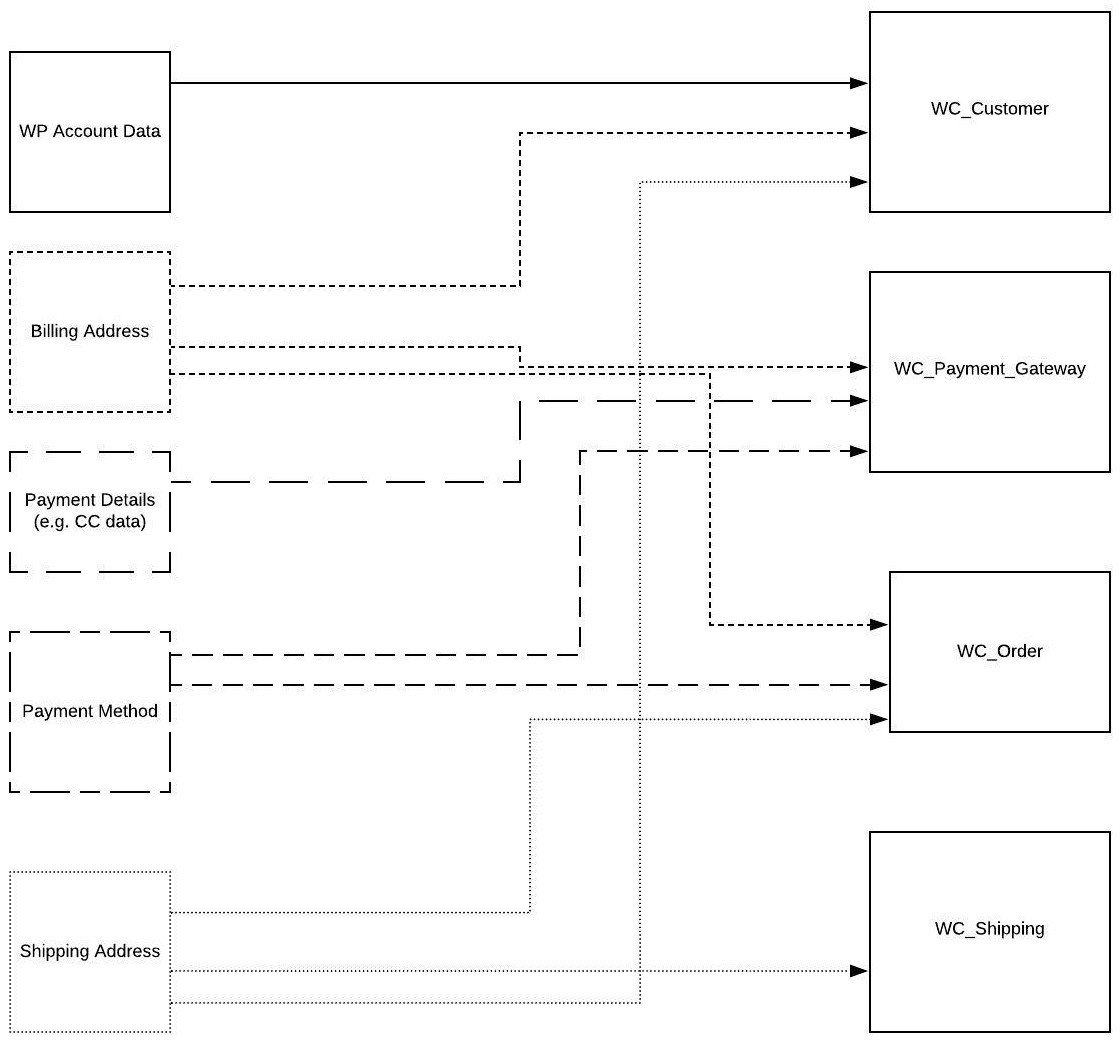
The Customer Build
if ( ! is_user_logged_in() && ( $this->is_registration_required() || ! empty( $data['createaccount'] ) ) ) { ...protected function process_customer( $data ) {...
$customer = new WC_Customer( $customer_id );... $customer->set_first_name( $data['billing_first_name'] ); ...
$customer->save();Customers are built in the process_customer method
If selected, a WP_User is created
Then a WC_Customer is created
Customer data is loaded from posted data.
Finally, the customer is saved
Create Order Logic
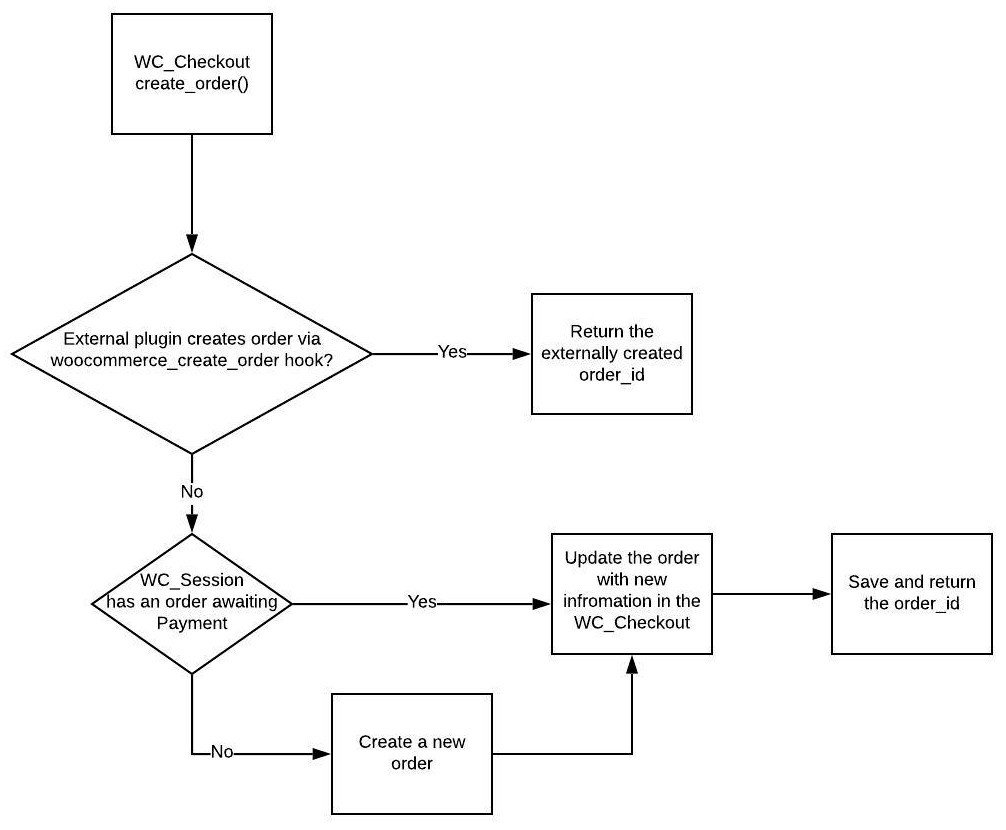
The Order Build
$order_id = apply_filters( 'woocommerce_create_order', null, $this );
if ( $order_id ) {
	return $order_id;
}
public function create_order( $data ) { ...$order_id = absint( WC()->session->get( 'order_awaiting_payment' ) );...else {
$order = new WC_Order();
}
Orders are built in the create_order method with posted data
There is an opportunity to hook in and create the order
Then WC_Checkout checks for existing session orders
Otherwise a new WC_Order is created.
The Order Build (cont)
$order->hold_applied_coupons( $data['billing_email'] );
	$order->set_created_via( 'checkout' );
	$order->set_cart_hash( $cart_hash );
	$order->set_customer_id( apply_filters( 'woocommerce_checkout_customer_id', get_current_user_id() ) );
	$order->set_currency( get_woocommerce_currency() );
	$order->set_prices_include_tax( 'yes' === get_option( 'woocommerce_prices_include_tax' ) );
	$order->set_customer_ip_address( WC_Geolocation::get_ip_address() );
	$order->set_customer_user_agent( wc_get_user_agent() );
	$order->set_customer_note( isset( $data['order_comments'] ) ? $data['order_comments'] : '' );
	$order->set_payment_method( isset( $available_gateways[ $data['payment_method'] ] ) ? $available_gateways[ $data['payment_method'] ] : $data['payment_method'] );
	$this->set_data_from_cart( $order );
The Order is loaded with data.
And finally saved.
$order_id = $order->save();Checkout Fields
Checkout fields are stored in the WC_Checkout $fields attribute.
The most notable consideration for developers is that these fields can be controlled with the ‘woocommerce_checkout_fields’ filter hook. Following this structure:
$this->fields=[		//each is an array of fields, see below for further strucutre
  billing  => array,
  shipping => array,
  account  => array,
  order    => array
]
$this->fields['billing']['billing_first_name']=[
label => "First Name",
required => true,
class => [ 0 => "form-row-first"], //array of HTML classes
autocomplete => "given-name",
priotiry => 10
]Posted Checkout Fields
WooCommerce provides two opportunities to customize checkout field entries once they are posted. The first is entirely field-specific:
apply_filters( 'woocommerce_process_checkout_' . $type . '_field', apply_filters( 'woocommerce_process_checkout_field_' . $key, $value ) );
return apply_filters( 'woocommerce_checkout_posted_data', $data );The second, is a general filter for all posted data
The uses cases for using these filters to customize the checkout experience are endless. For now, this should get you started on thinking about the possibilities 
Conclusion
Remember, WC_Checkout is primarily a data gatherer/checker and can be used to customize the user’s experience and modify the inputs received by WooCommerce
However, if you are looking to modify some of the key business logic—chances are, you’ll be better off looking elsewhere.
Before we get into a customization use case, care to check what you’ve learned?
Keyboard shortcuts
Down arrow Next slide
Up arrow Previous slide
Color codes
Hover over text more additional info